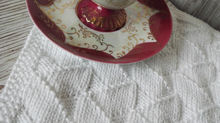
Cherisaurus Shawlette
- Lone Drachmann

- Apr 1, 2018
- 3 min read
I've been busy designing and doing baby clothes for some customers. It's been really nice to be able to help people and I've got a lot of positive feedback.
Today I want to show you my latest design. It's a shawlette you can use over your shoulders in the summer, or as a scarf when it gets colder. The design made me think of my son when he was little. He was crazy about dinosaurs, but couldn't always pronounce their names right. I'll spare you the details, but he was so cute and funny (he hates me now).

Anyway..........the shawl can be made in whatever wool you have in your stash. The gauge isn't that important and the lace pattern is easily adapted to either smaller or bigger size.

If you're a beginner, please don't hesitate to contact me for help xx.
Needles : 4 mm (US6) Wool: Colour A: Malabrigo Sock, Caribeno, 3 ply, 100% Merino 100g, 402m (439 yds) Colour B: BC garn baby Alpaca, 3 ply, 100% baby Alpaca, 50g, 250m (273 yds) You can use the wool you want for this project, just be aware that the size will change accordingly. Stitch marker, darning needle. Abbreviations: K: Knit P: Purl Yo: Yarn over K3togtbl: Knit 3 together through back link Sts: Stitches PM: Place Marker Final measurements: My shawl measures 160 cm (5 feet 4 inches) in width and 70 cm (2 feet 4 inches) in length. I’m an aggressive blocker, so you may find your shawl comes out a bit smaller. Pattern: Row 1. *k1, yo, k3togtbl, yo* Repeat from * to* Row 2 . purl Row 3. Knit Row 4. Purl Repeat Row 1-4 throughout Start the shawl: Garter cast on 10 sts: With colour A, cast-on 3 stitches. Knit 8 rows. This produces 4 garter stitch ridges on each side of work. Next row: Knit 3, turn work 90 degrees clockwise, pick up 4 stitches along garter stitch edge (one in each of the 4 garter stitch ridges), turn work 90 degrees clockwise again, then pick up 3 stitches along cast-on edge (10 stitches total). Set up rows: Row 1. K3 (edge sts), yo, k1, yo, k1, PM, k1, yo, k1, yo, k3 (edge sts) Row 2 . K 3, purl to marker, PM, purl to last 3 sts, k3 Row 3. K3, yo, k to 1 st before marker, yo, k1, PM, k1, yo, k to last 3 sts, yo, k3 Row 4. K 3, purl to marker, PM, purl to last 3 sts, k3 Row 5. K3, yo, k1, yo, k3togtbl, yo, k1, yo, k1, PM, k1, yo, k1, yo, k3togtbl, yo, k1, yo, k3 Row 6. K 3, purl to marker, PM, purl to last 3 sts, k3 Row 7. K3, yo, k to 1 st before marker, yo, k1, PM, k1, yo, k to last 3 sts, yo, k3 Row 8. K 3, purl to marker, PM, purl to last 3 sts, k3 NOTE: The diagram starts with the first yo increase. The edge sts are not included in the diagram.

You increase 4 sts on every right side row: After the 3 edge sts, before and after the 2 middle sts (you have the marker between these 2 sts) and before the last 3 edge sts Continue in pattern repeating row 1-4 until you have 158 sts on the needles, incl. the edge sts, ending with a wrong side row. Don’t turn. Cast on 4 sts with colour B to begin the lace. TIP: You can continue in pattern until the whole skein of wool is used if you wish. The shawl will be slightly bigger. The Lace: The lace is knitted diagonally on the shawl, removing sts from the shawl as you go, until all sts have been removed.
Row 1. S1p, k2, k2tog, turn Row 2 and all alternate rows : S1p, k to end of row Row 3. S1p, [k1,yo] twice, k2tog, turn Row 5. S1p, [k1,yo] twice, k1, k2tog, turn Row 7. S1p, [k1,yo] twice, k3, k2tog, turn Row 9. S1p, [k1,yo] twice, k5, k2tog, turn Row 11. Cast off 8, k2, k2tog turn Row 12. As row 2

Repeat row 2-11 throughout, until there are no sts left from the shawl, cast off. Finishing : Weave in all ends. Wash and dress, pinning out each point of the lace.

And you're done!!
Feel free to make the shawl for friends and family or even sell the finished product, but I humbly ask you to give me credit for the pattern and share the link to my site. Don't sell the pattern or claim it as your own please


Comments